Learn how to create Inventory Adjustments and why they are beneficial
Click here for the video.
Inventory Adjustments may be made by an Owner or Manager. Adjustments may be made by Reception if Allow Front Desk to Access Inventory Adjustment Report is enabled.
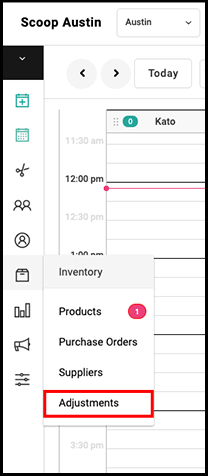
1. Select "Inventory" > "Adjustments".
Adjustment History Overview
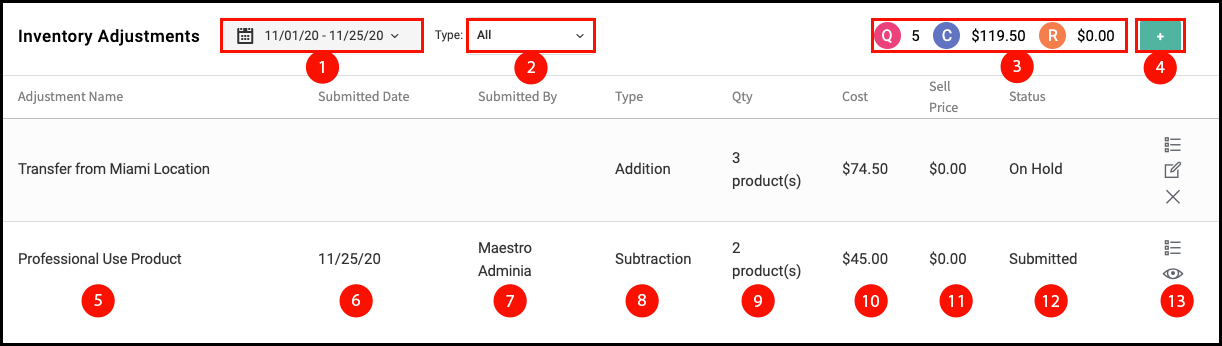
1. Select the Date Picker to choose a single date or range of dates to view
2. Select the Adjustment Type to view: Subtraction or Addition
3. Q is the Quantity of products on the current report
C is the total Cost of the Products
R is the Sell Price of the Products
4. Select + to create a new Adjustment
5. The Adjustment Name is the name given to the adjustment when it is made
6. The Submitted Date will be present if the Adjustment has been submittied
7. The name of the employee who Submitted the Adjustment will show here
8. The Type of the Adjustment: Subtraciton or Addition
9. The Quantity of the products in the individual Adjustment
10. The total Cost of the Adjustment
11. The Sell Price (Retail) of the products in the Adjustment. If the Products do not have a sell price, such as Professional Use products, this amount will be $0
12. Status is On Hold or Submitted
13. The Eye will view the Adjustment
The Pencil will edit the Adjustment. This is only available if it has not been submitted
The Line Items will show the History of the Adjustment
The X will delete the adjustment. This is only available if it has not been Submitted
Adjustment Screen Overview
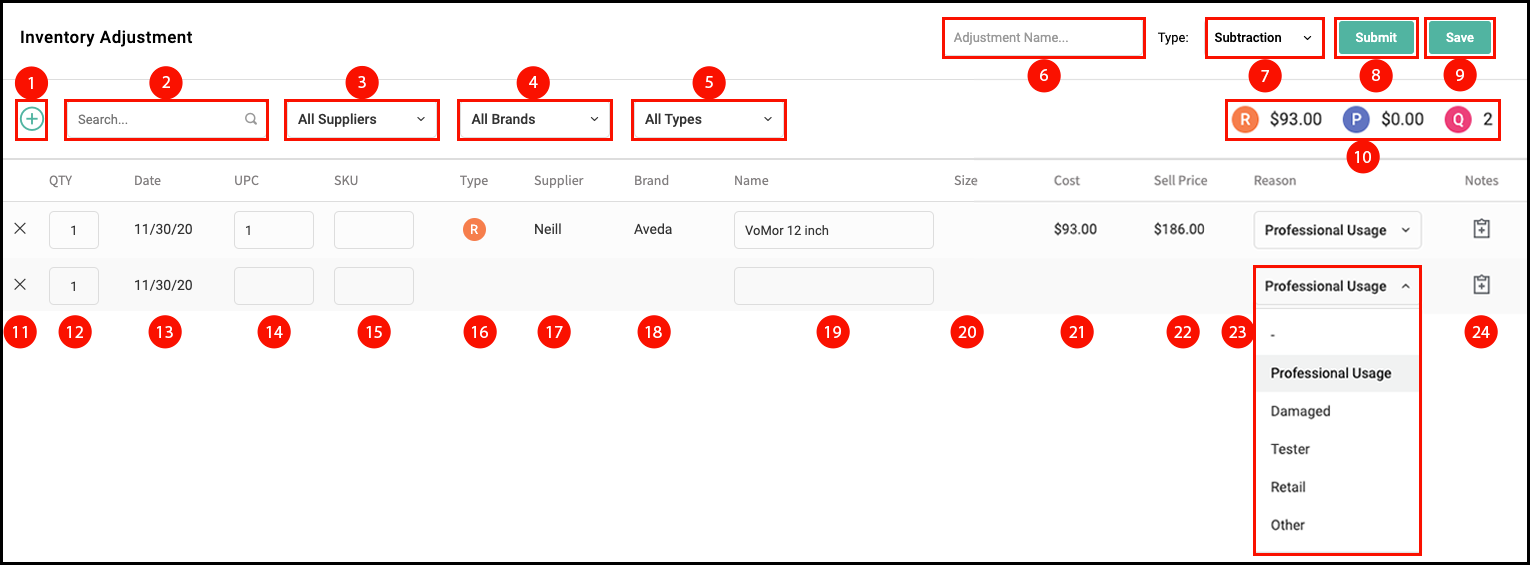
1. Select + to add a line to the Adjustment. Use the new line to search for a Product to add
2. Searches products currently displayed
3. Filters the displayed Products by Supplier
4. Filters the displayed Products by Brand
5. Filters the displayed Products by Retail or Professional
6. Name of the Adjustment. i.e. "Salon Use 11/2020". A name must be input before it can be saved
7. Adjustment can either Add to or Subtract from Inventory. Adding to inventory can be useful for receiving product from another location or receiving items that are not in a purchase order. Subtracting from inventory can be useful for sending products to another location, damaging a product out, or removing professional-used products from inventory
8. Selecting Submit will make changes to the inventory quantities. Once an Adjustment has been Submitted it cannot be edited
9. Selecting Save will save the adjustment but not submit it
10. R shows the total Retail on the Adjustment
P shows the total Professional on the Adjustment
Q shows the number of products on the Adjustment
11. X will delete the Product from the adjustment
12. Quantity defaults to 1 but may be changed by inputting any other number
13. The Date is the date that the product was added to the Adjustment
14. UPC is blank for a new line item. Select this field and then use a barcode scanner to search for an item by barcode
15. SKU is blank for a new line item or a product with no data in the SKU field. Enter information here to search for the product by SKU
16. Type is Retail or Professional
17. Supplier is the Supplier of the Product
18. Brand will show information once a product has been selected
19. The product's name is displayed in the Name field. Search for a product by entering its name or partial name. I.E entering shampoo will bring up all products with "shampoo" in their name, the correct product can then be chosen
20. Size information displays here
21. The Cost of the item is shown here
22. The Sell Price of the item is shown here
23. Reason Options are: Professional Usage, Damaged, Tester, Retail, Transferred into location, Transferred out of location, Discontinued, Expired, Education, Breakdown of gift set, Donated, and Marketing, and Other.
24. A note can be added to the individual line item. I.E. "Product sent to Miami location", "Product was dropped and damaged"